
INTRODUCTION
Elevate your mobile marketing strategy by adding our powerful messaging platform to your list of communication channels. Through our direct Oracle Eloqua integration, you can use Campaign Canvas or Program Builder to send and receive SMS.
Your campaigns are as simple or as personalised as you want them to be. Send one-way outbound SMS messages or take advantage of Oracle Eloqua custom data objects and contact records to capture incoming messages, outbound delivery reports and unsubscribes. Our app will lookup contacts based on number and match existing custom data that can be passed to your custom object.
"Our Oracle Eloqua SMS integration is the most powerful available. We have Oracle Eloqua experts and partners standing by to assist you in automating your messaging workflows."
Quick & Easy Set Up
- Fully self serve
- Free support
- Simple to follow documentation
Flexible Campaign Steps
- Cloud Action to Send SMS
- Cloud Decision to process SMS Replies
- Cloud Feeder to receive Incoming Messages
- Cloud Feeder to track SMS link hits
Powerful Personalisation
- Insert data into messages from contact objects
- Insert data into messages from custom objects
- Lookup data from contact objects based on incoming message and pass to custom objects
Powerful Tools for Global Delivery
- Automatically format mobile number for delivery based on contact country
- Fallback to account country if not available with contact
- Expert advice on global functionality and pricing
SETUP
Install and Configure the Burst SMS Cloud Connector for Oracle Eloqua
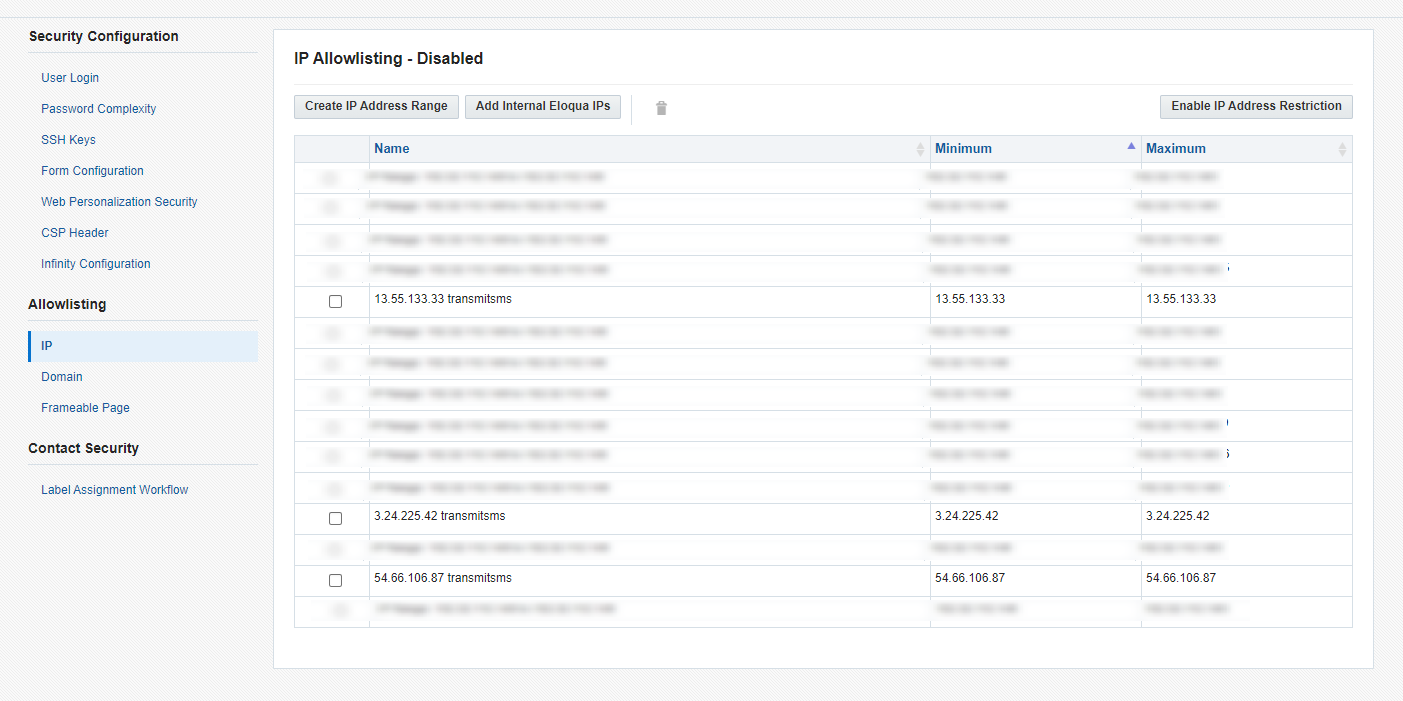
NB: If you are using a firewall you need to whitelist IP addresses (previously 52.65.172.155):
- 13.55.133.33
- 3.24.225.42
- 54.66.106.87
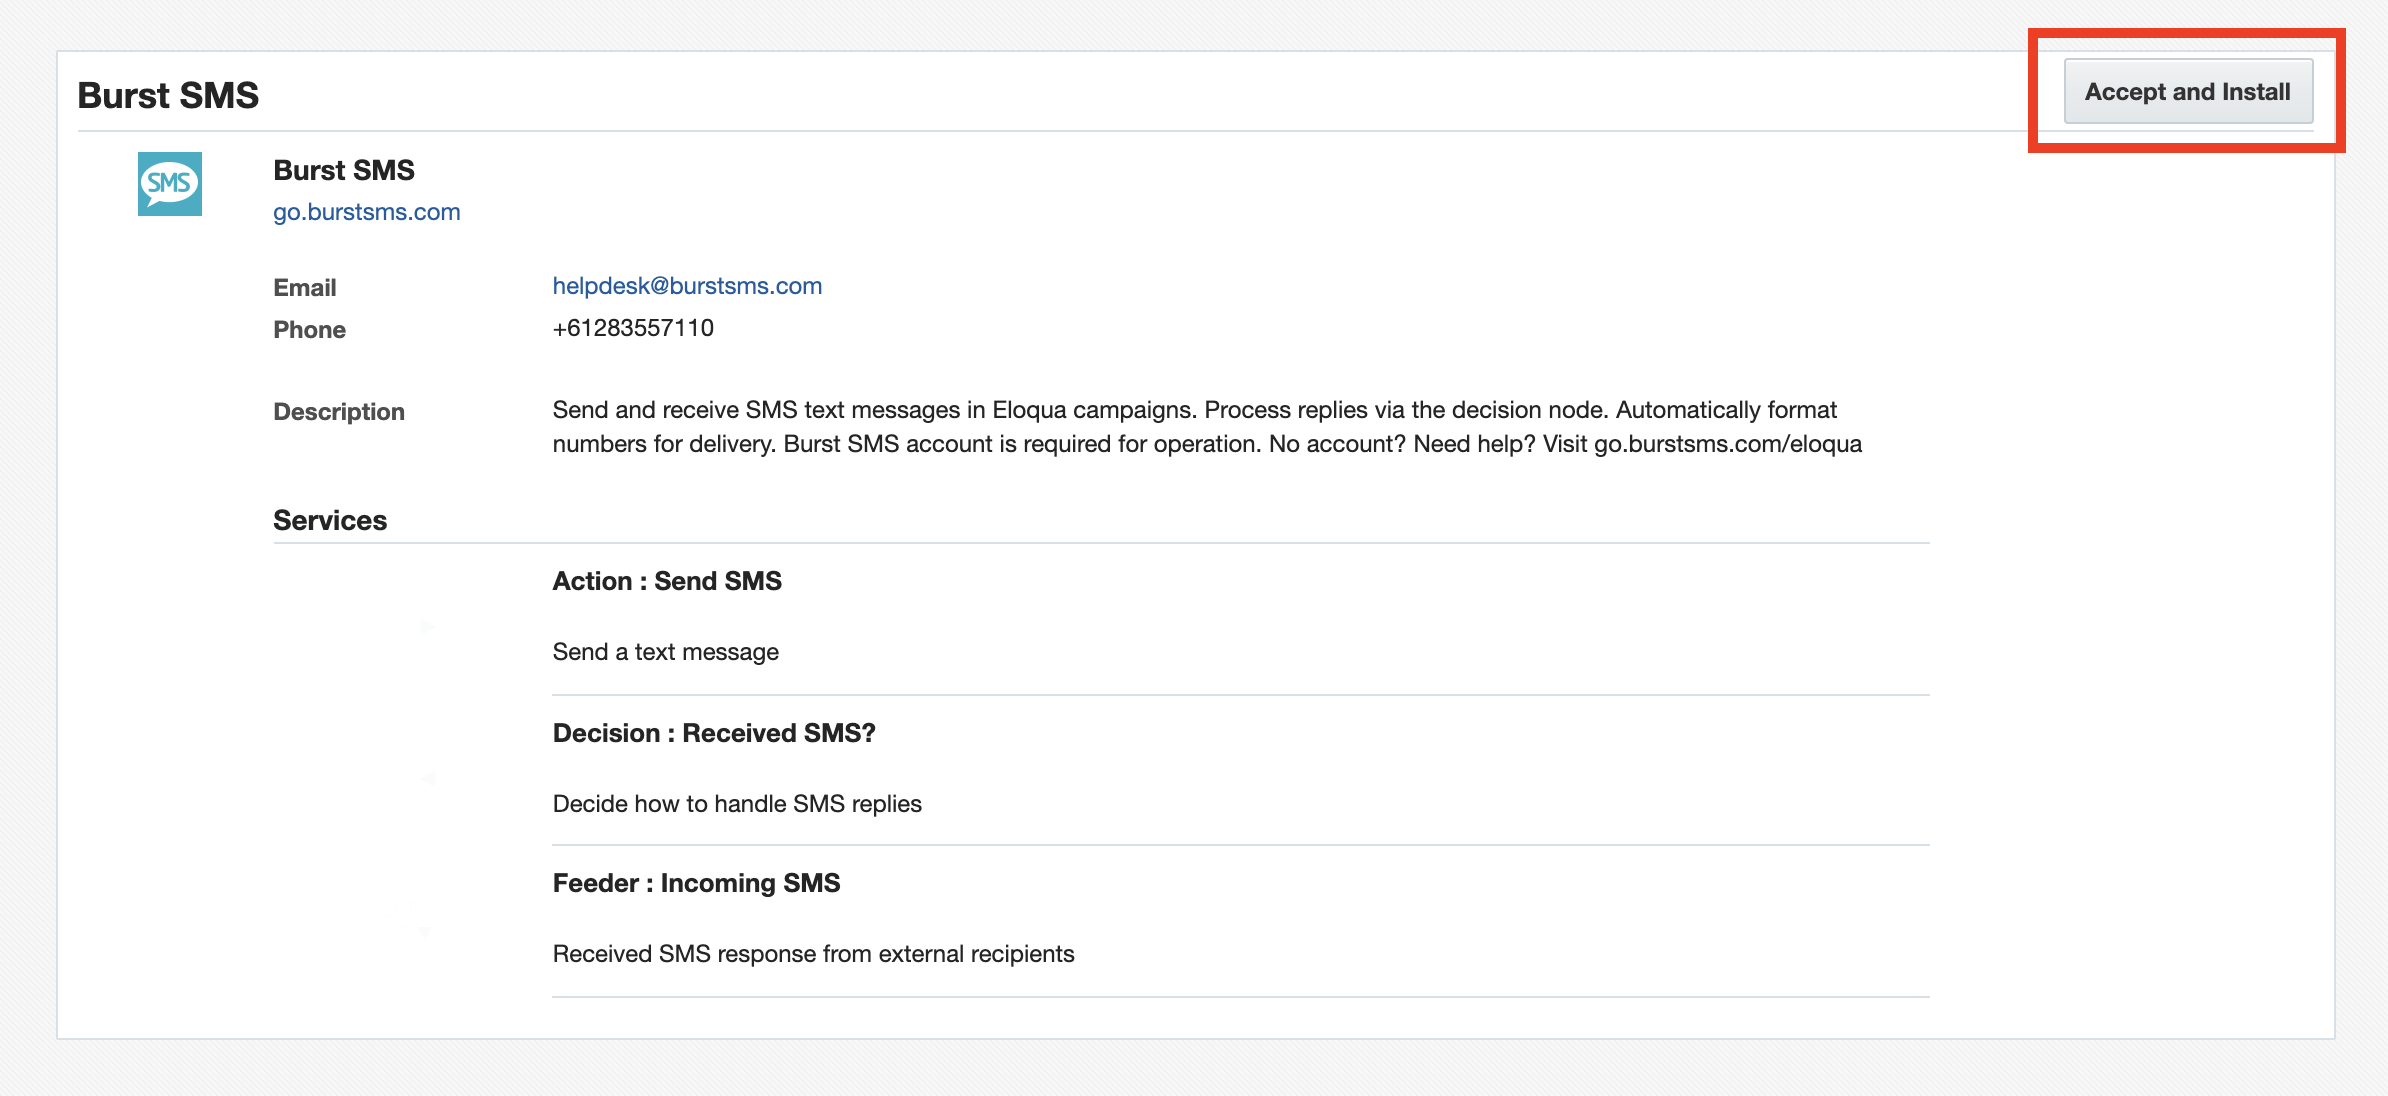
- Install the Burst SMS Connector: CLICK HERE TO INSTALL
- Click "Accept and Install"
- In Oracle Eloqua, go to Settings (via top left Menu).

- Select APPS under "Platform Extensions".

- Select Burst SMS.
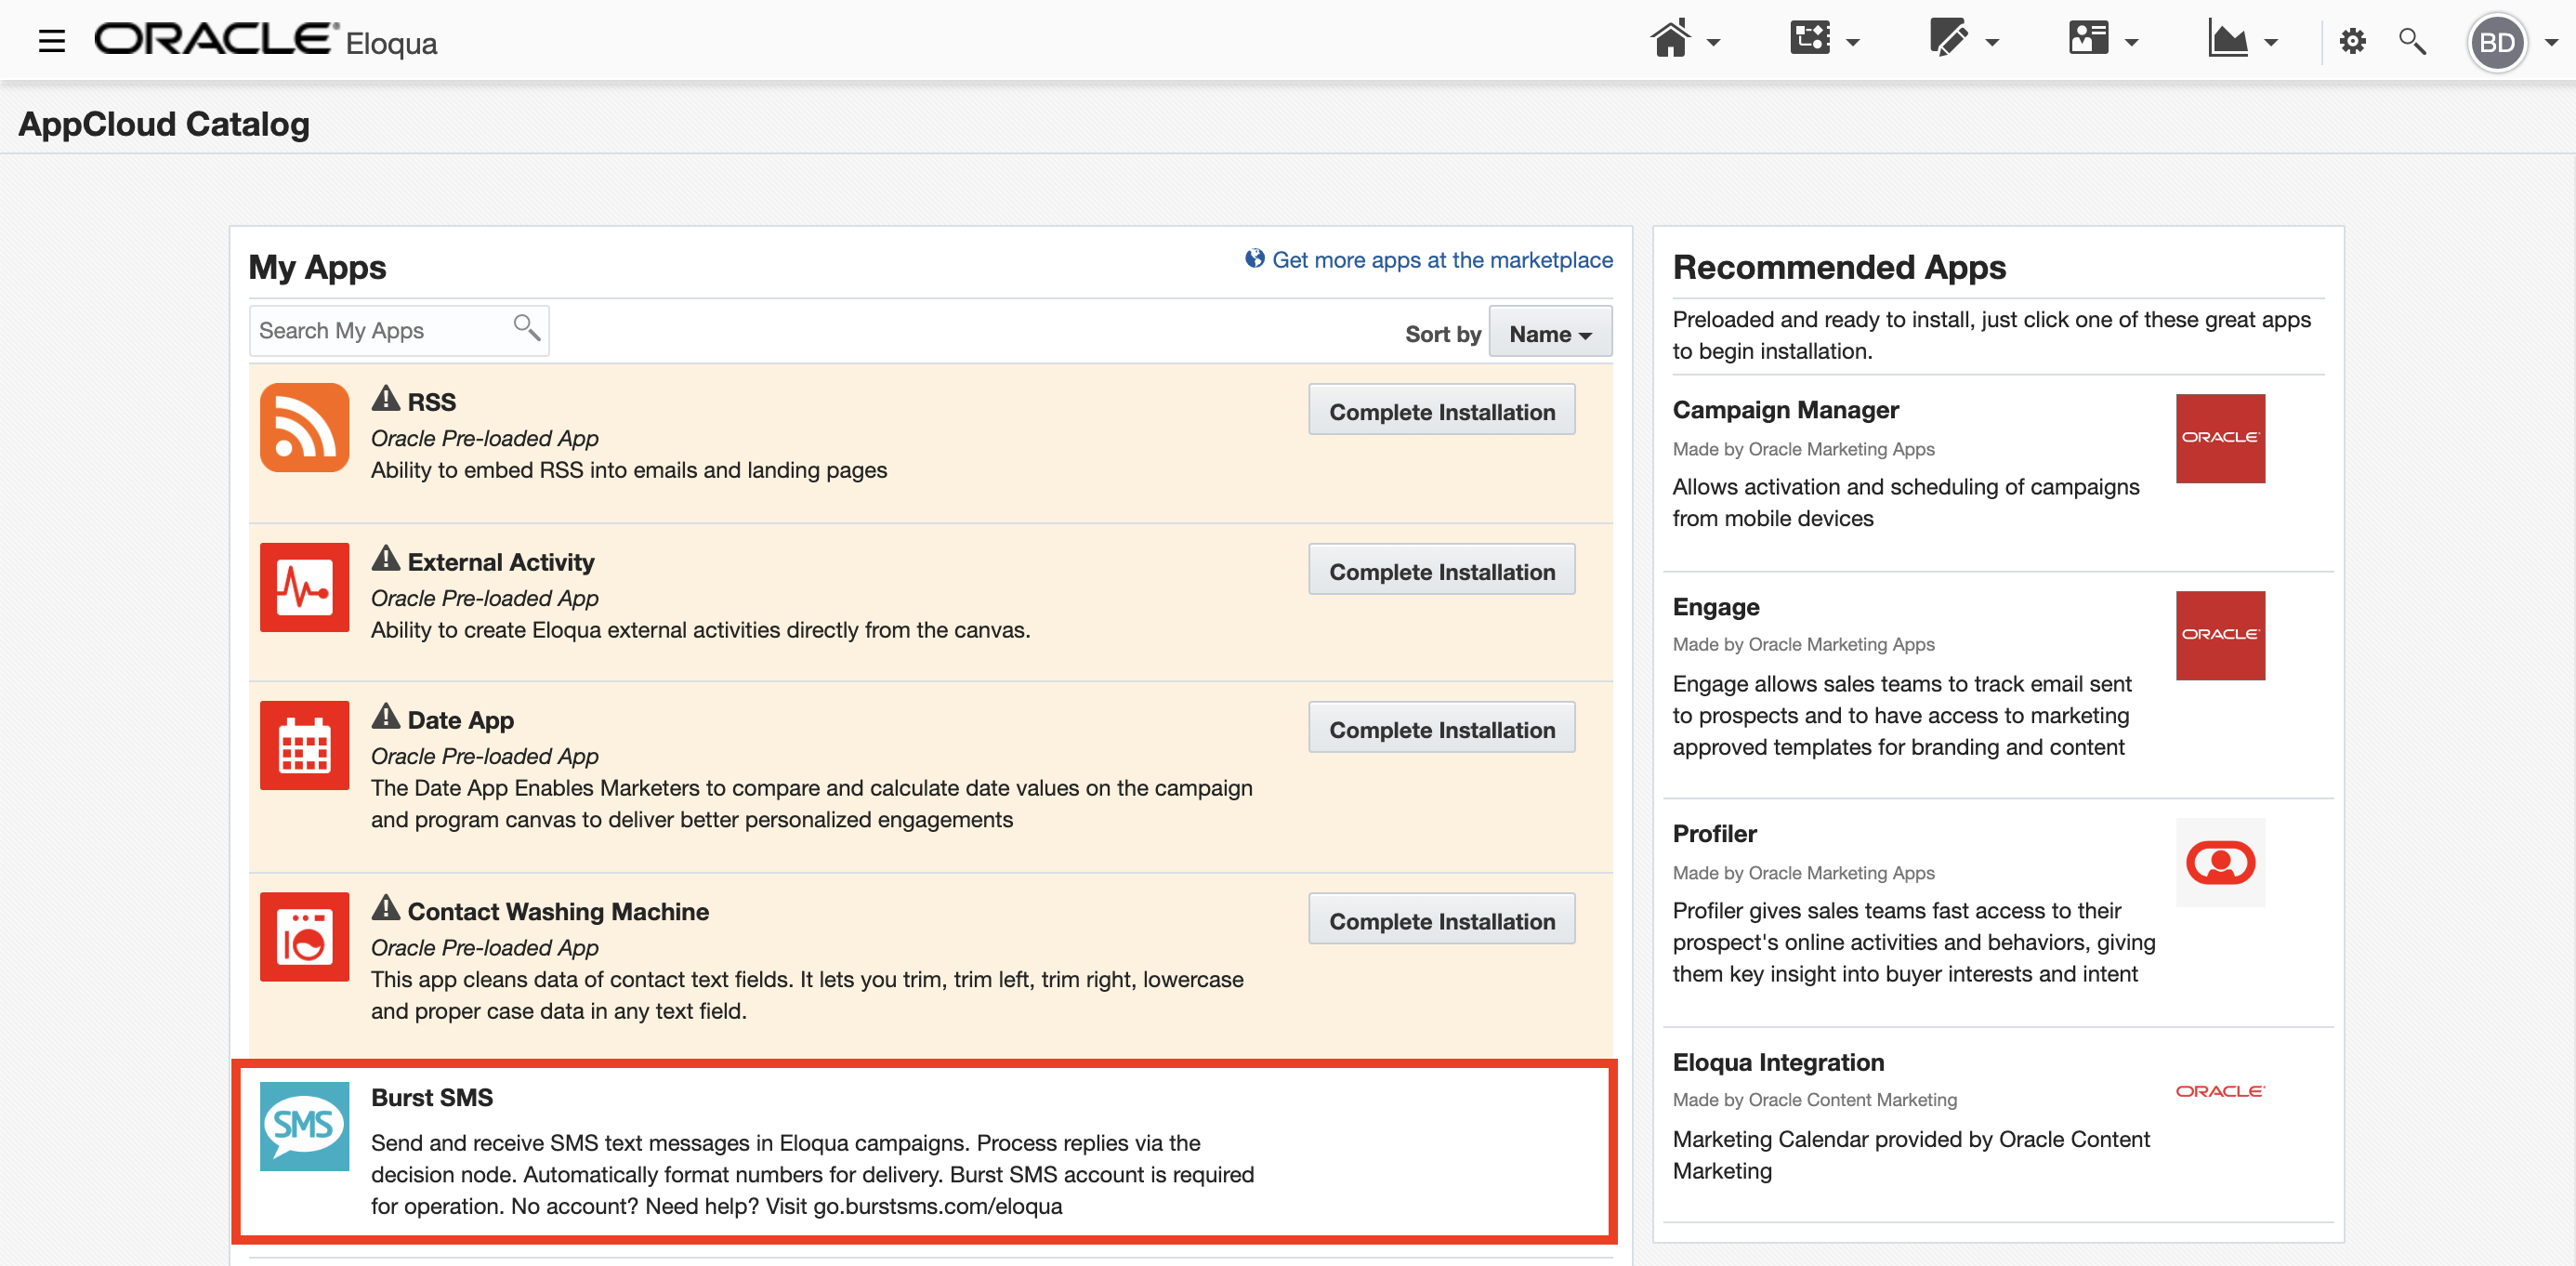
- Select Configure (top right cog icon).

- Fill in your Burst SMS API Key and Secret (from Step One).
- Select your desired default country for Number Formatting.
- On the configuration screen you can optionally map different messaging functions to custom objects.
- Webhooks can be overwritten here or within the settings section of your Burst SMS account if needed, deliveries and responses will still process however will be slower.
- Click Update.

ADDING BURST SMS FEATURES TO YOUR CAMPAIGN CANVAS
On successful installation of the Burst SMS Cloud Connector you will see 3 new elements available for use on the Campaign Canvas. The Cloud Feeder to process messages texted to your dedicated virtual number (Incoming SMS), The Cloud Decision to process Replies (Received SMS?) and the Cloud Action to Send SMS.

Receiving SMS texted to your dedicated number.
In the NUMBERS section of your Burst SMS account you will see your dedicated virtual number. People can text this number and you can pass the message directly to your campaign using the Cloud Feeder.
1. Drag the Incoming SMS item to the canvas to start. Click on the item to edit its settings. You can rename the item for context.
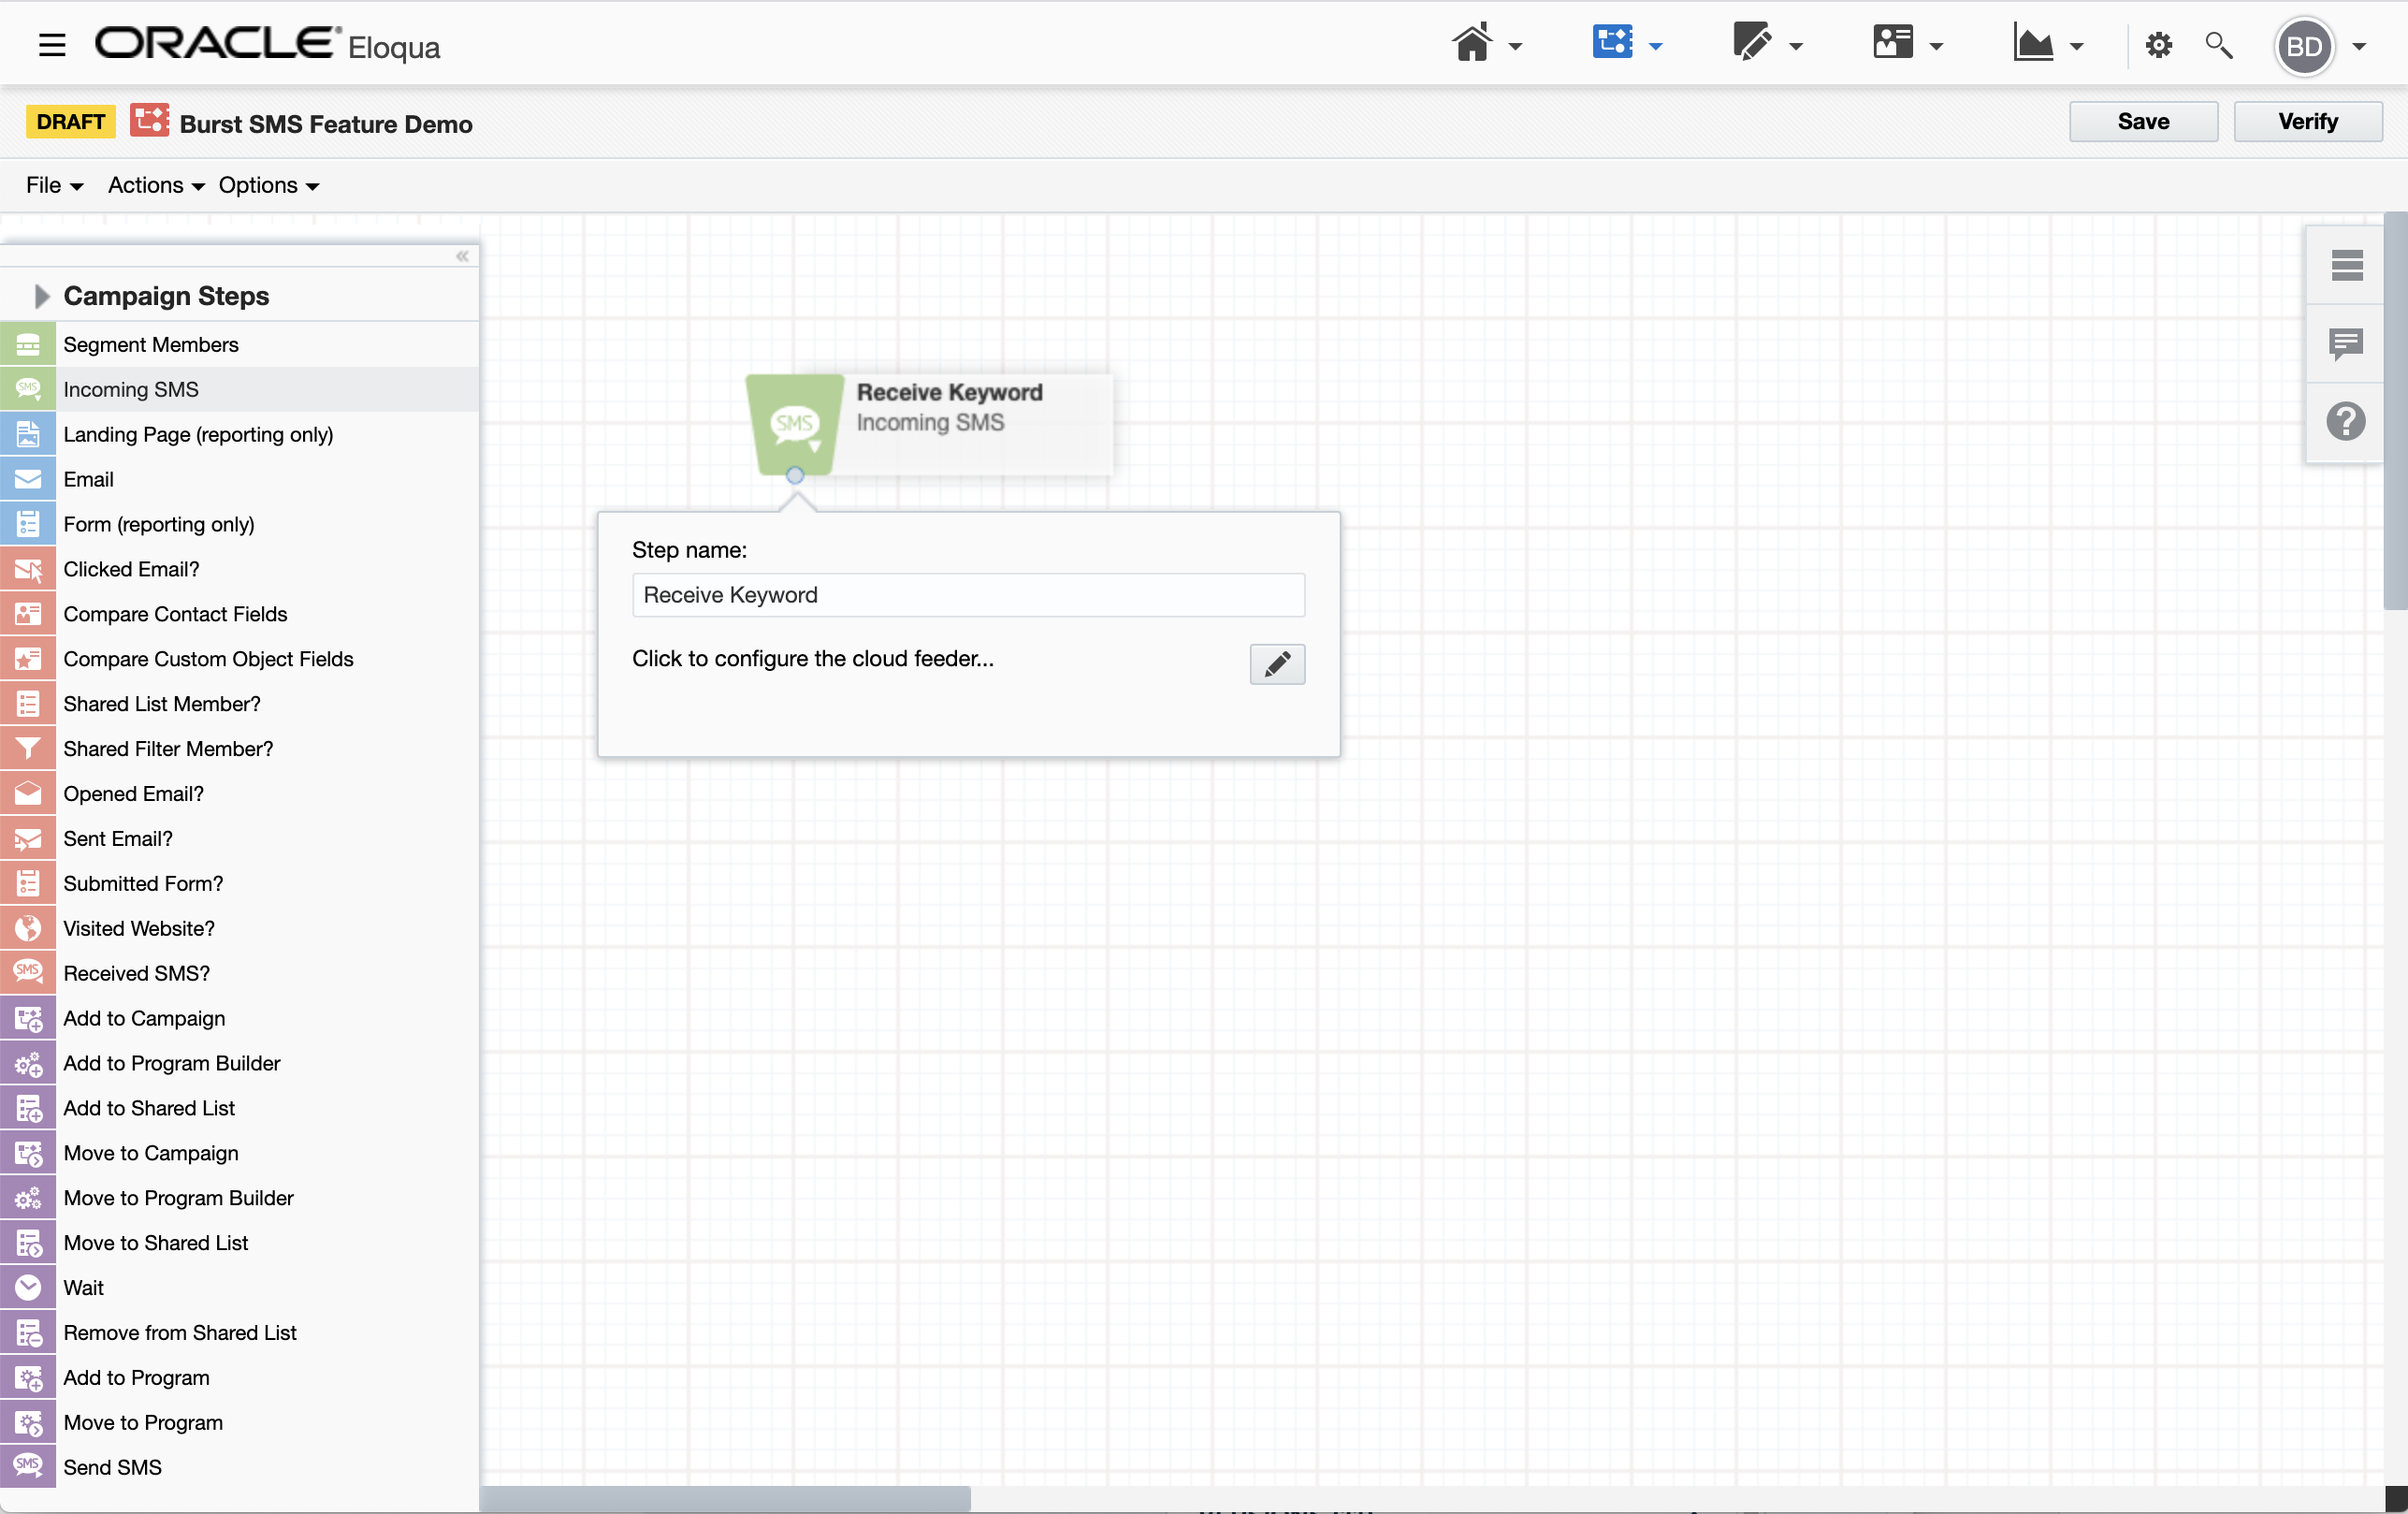
2. Click the pencil to configure the Cloud Feeder.

3. You now see options to select which number you wish to receive on, what you would like to receive and also the ability to map data from the incoming message to a custom object.
Virtual Number - This is the number in your Burst SMS account that people will send messages too.
What type of text are we looking for - Choose to only accept text if its a specific word or an email address.
Custom Objects - Map incoming data to your custom object. (Overwrites default config settings)
When somebody texts in a search is performed by default to see if the number already exists. If a number is not found a record is created in the database with an email address we create which is <mobile-number>@transmitsms.com.
If a record is found we will use that contact to add to the automation.
Creating Custom Objects
For information on creating Custom Objects to use within your campaigns, please click Here.
Sending Automated Text Messages
1. Drag the Send SMS Action item to the Campaign Canvas, Click on the item to edit its settings.
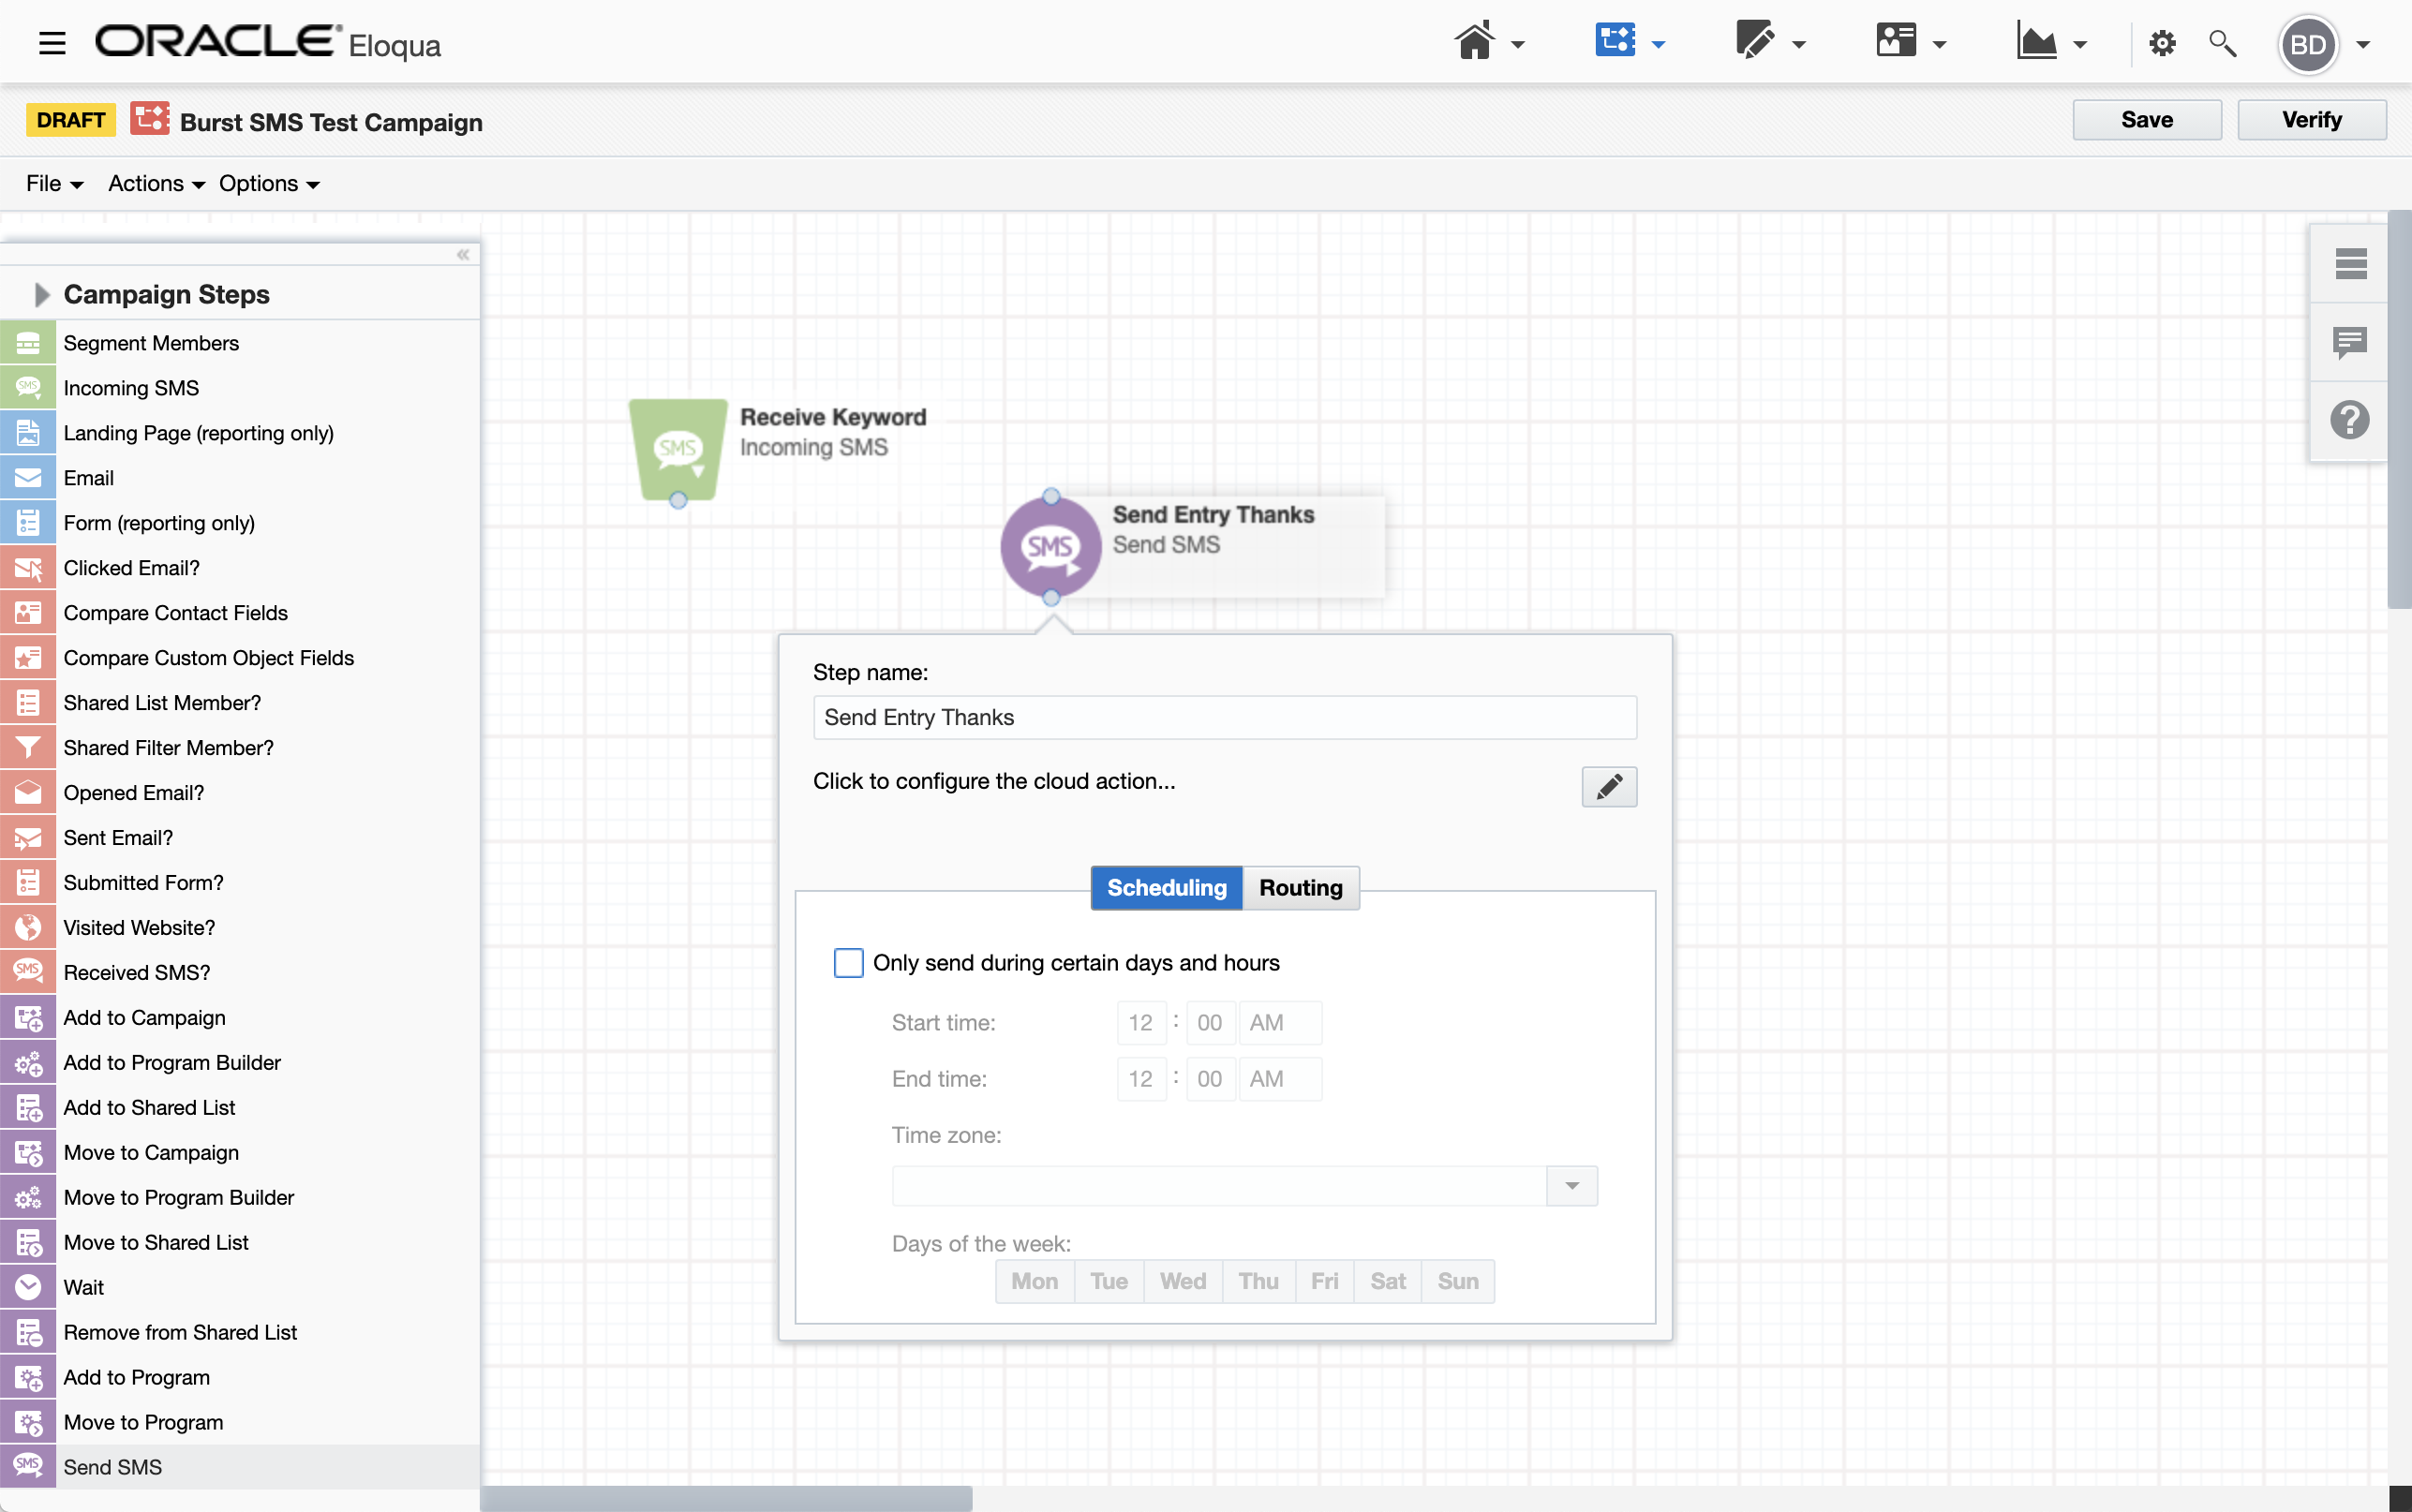
2. Click on the pencil to edit the Cloud Action
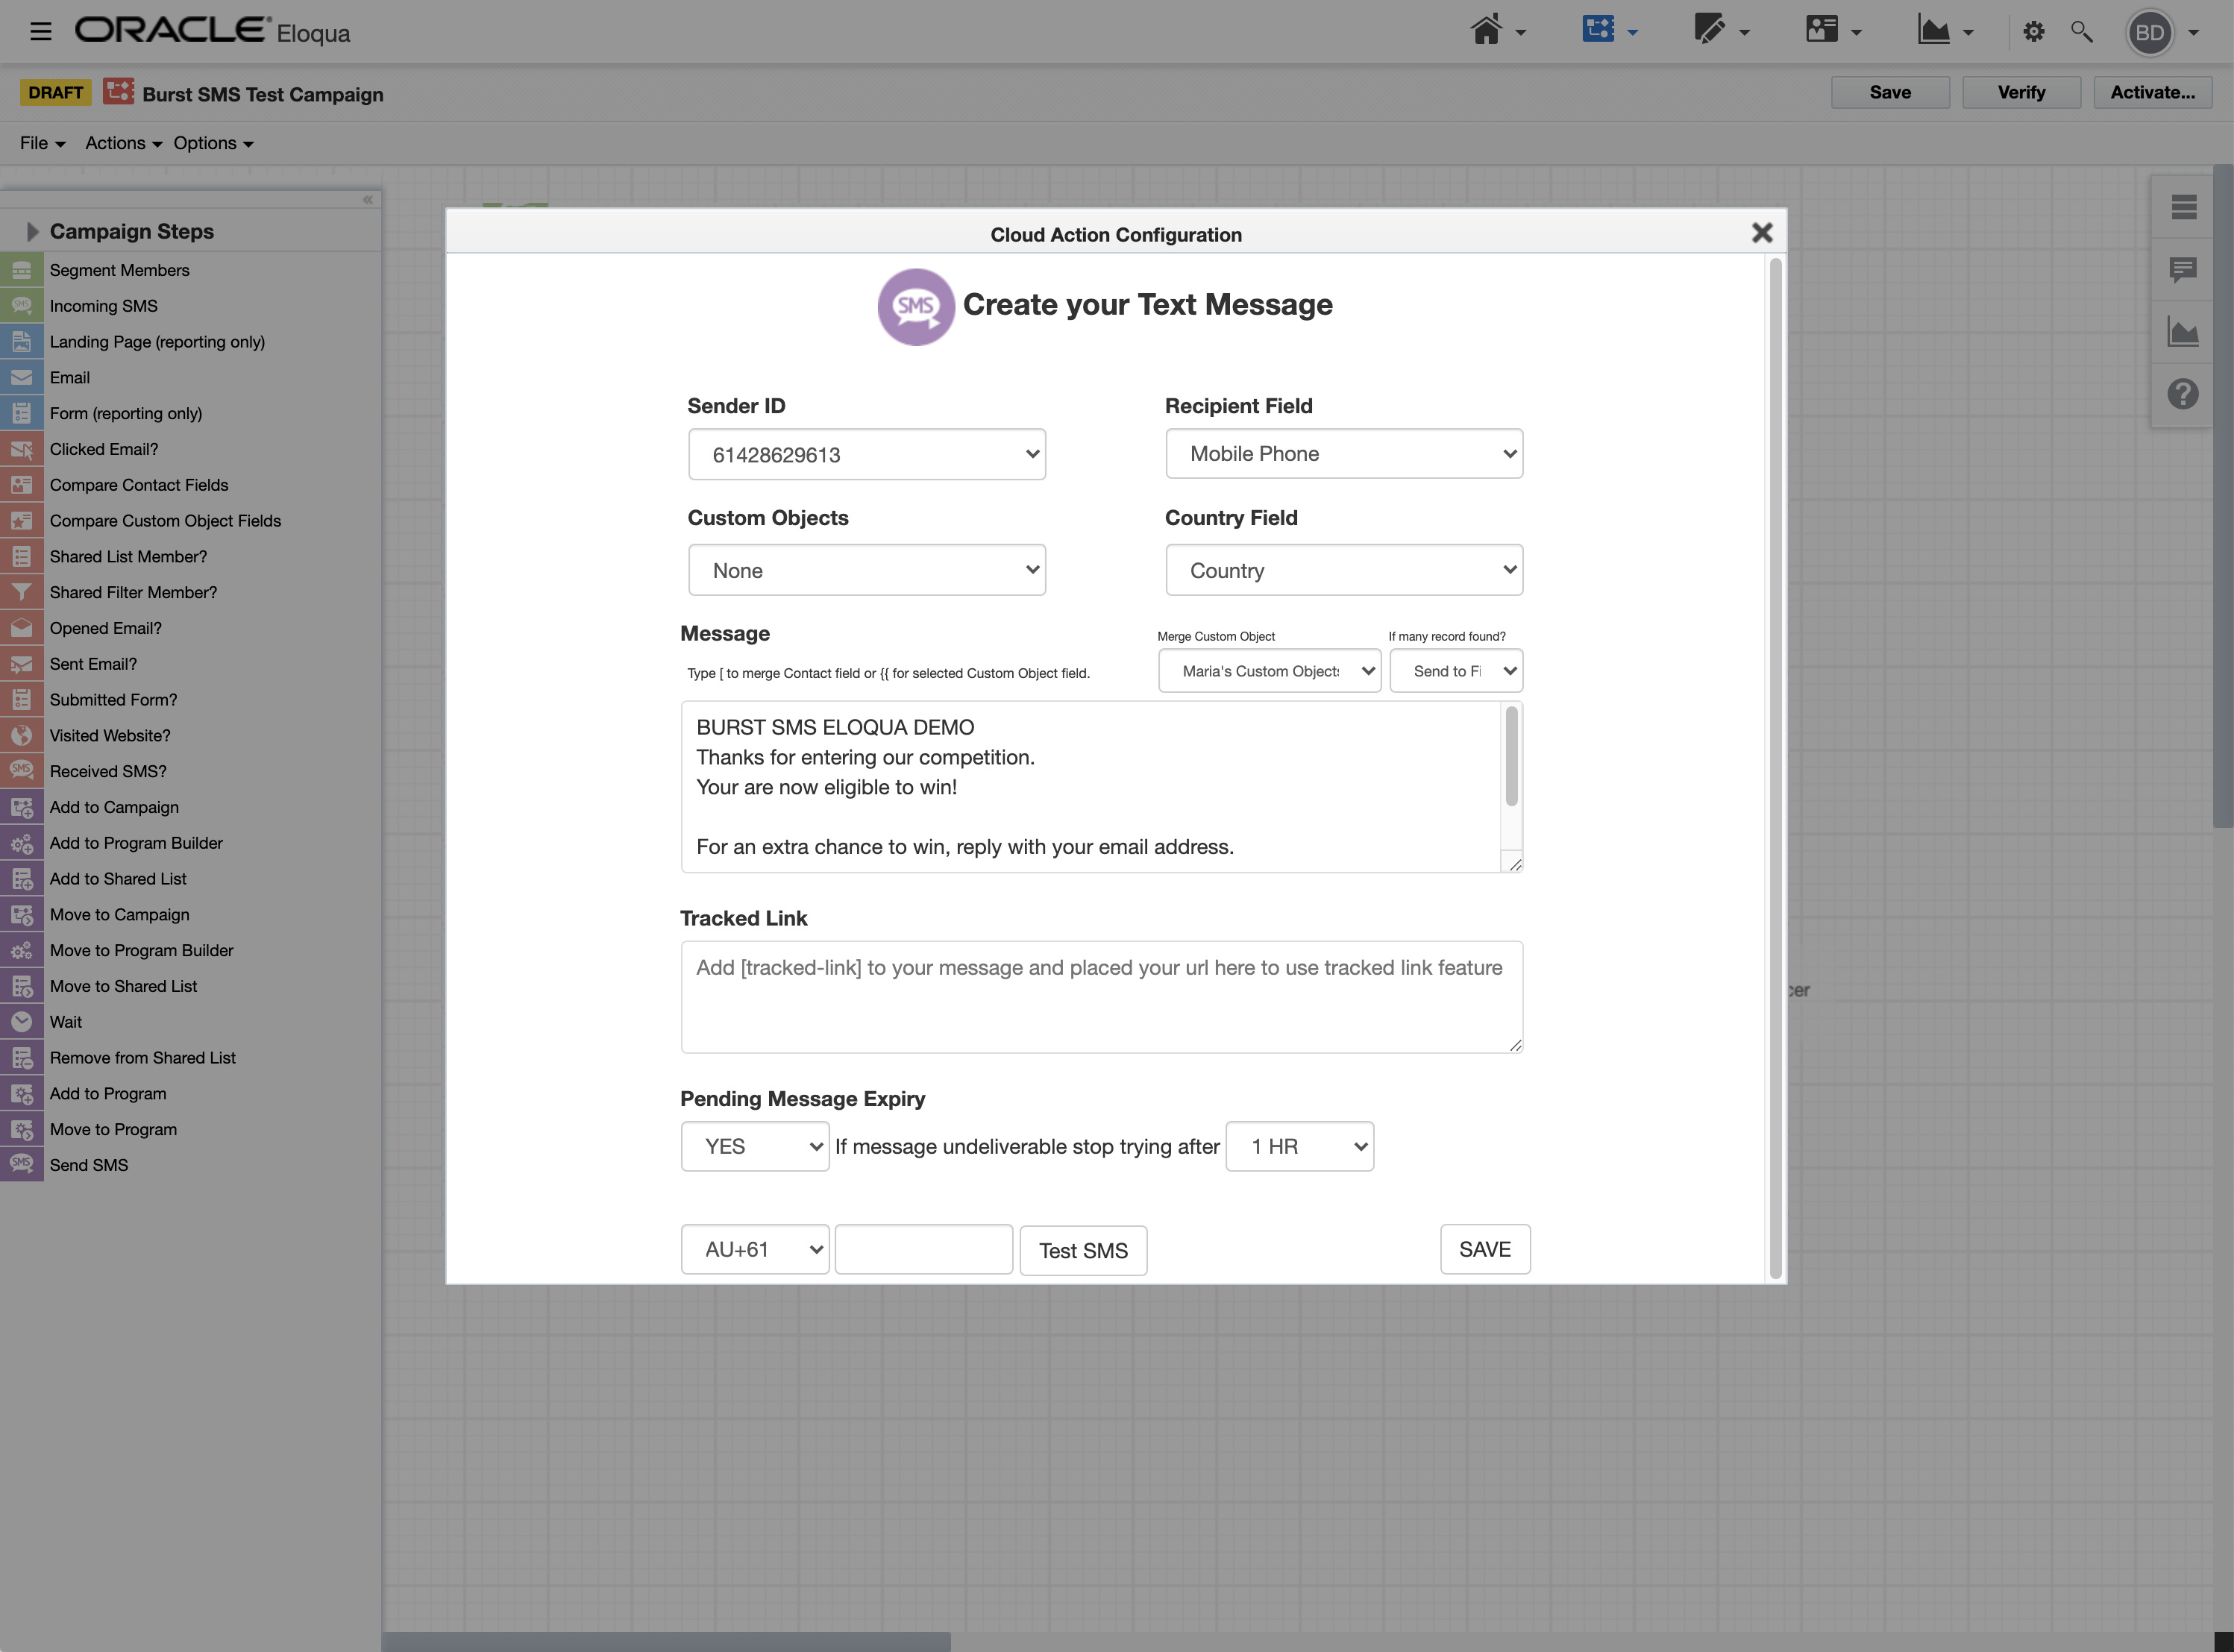
3. Setup your Send SMS Action options
Sender ID - This is the number the message will come from.
Recipient Field - This is the number we are sending the number to. This is a field within the contact object that contains a mobile number. By default we use the standard MobilePhone field. If your mobile number is in a different field please map it here.
Custom Objects - Here you can map sent data to your custom object. (Overwrites default config setting)
Country Field- In order to format numbers correctly for delivery to specific countries, we need to know the destination. You can map country names here and our system will automatically format the number for you. This means you will not have to pre-format the numbers in your database.
Merge Custom Object - You can merge data from your custom object. You can also choose your preferred behaviour if more than one record is matched.
Merge Contact - You can merge data from the contact object into your message content
Tracked Link - Track this URL by adding the variable [tracked-link] to your message. Clicks on this link can be used to automate actions using the SMS Link Hits Feeder.
Pending Message Expiry - You can send an instruction to the carriers to stop retrying to send your message after selected number of hours.
Test SMS feature - You can enter your phone number and and click on TEST SMS button to send a message to your handset to preview the message. Please note the custom and contact field name will appear instead of the actual field data.
Receive Reply Text Messages
Reply messages work on a little differently to incoming messages as they are a reply to a message the automation has sent. They work using a decision node and can be processed down a decision tree. In our case we will wait for a period of time and if a reply is received within the given time we can process in the affirmative and if no reply is received we can process in the negative.
1. Drag the Send SMS Action item to the Campaign Canvas, Click on the item to edit its settings.

2. Click on the pencil to edit the Cloud Decision
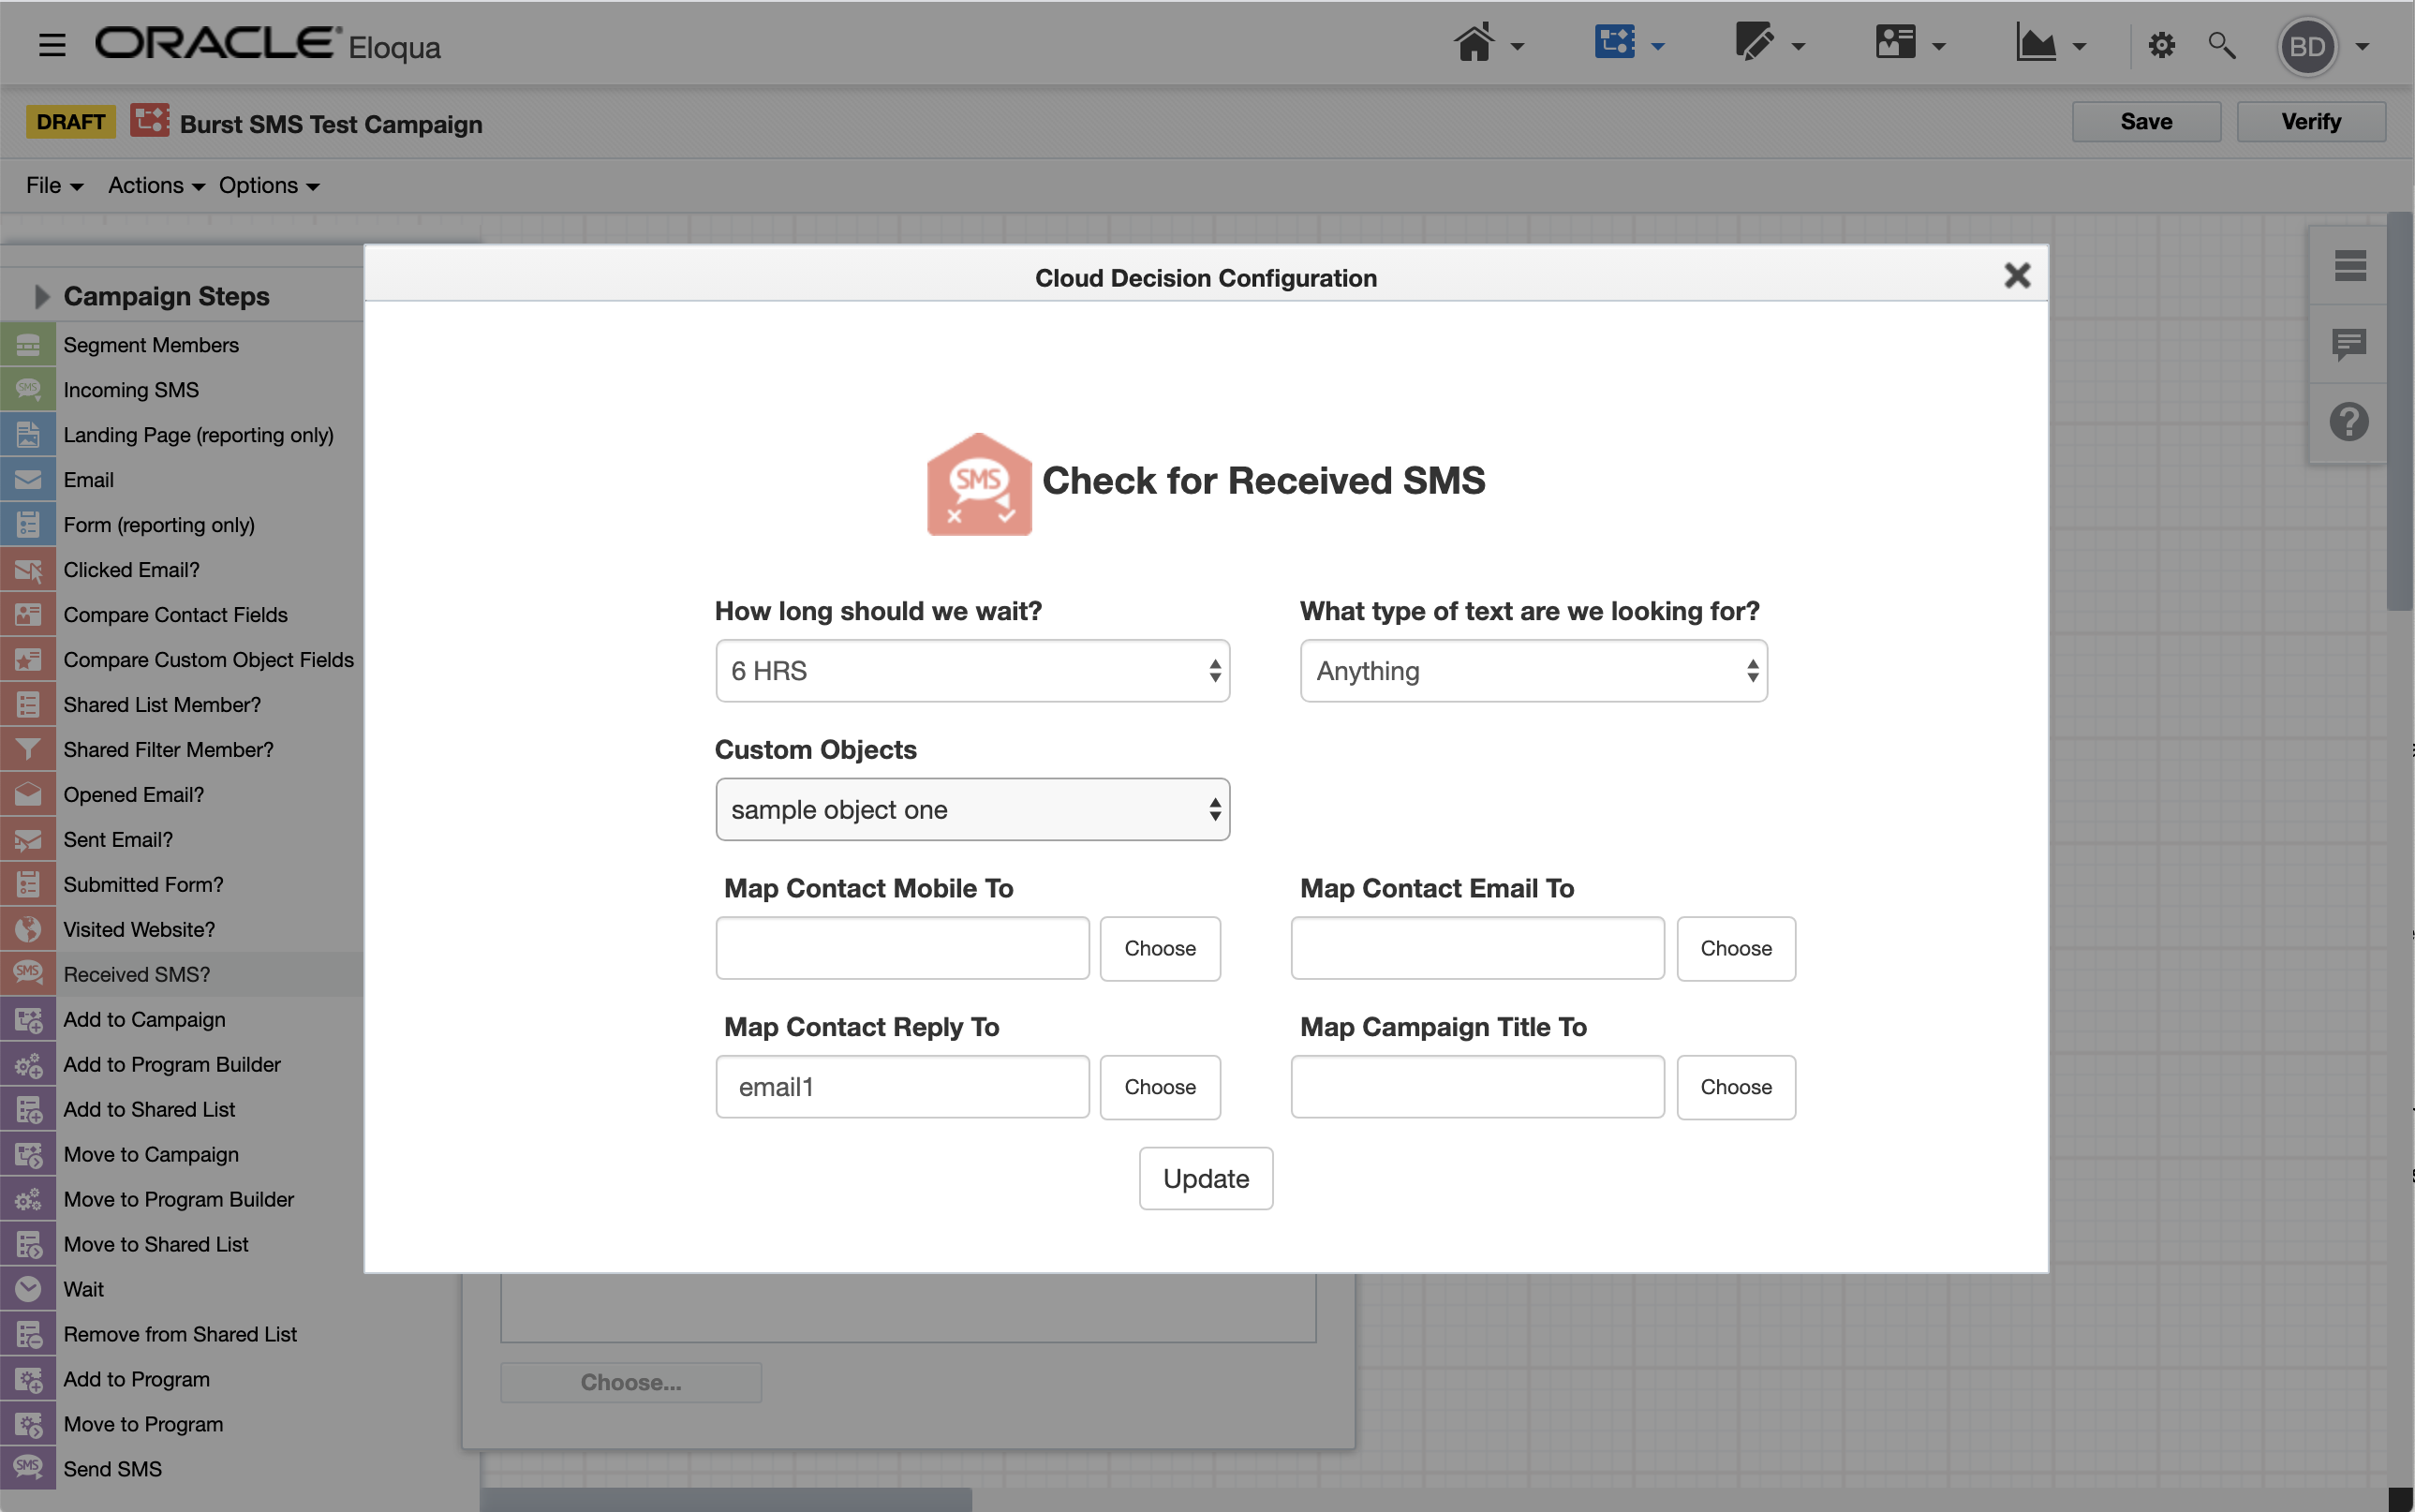
 3. Setup your Check for Received SMS Cloud Decision options
How long should we wait? - This is the period of time that we will wait before processing the negative option
What type of text are we looking for? - You can elect to wait only for a specific word or any text response.
Custom Objects - You can map the incoming data to your custom object. In our example we have asked for an email address so we will map the incoming text where we are expecting an email address to our custom object. (overwrites default config setting.
Completing your Campaign
In our example we have setup a further text message acknowledgement and reminder of the bottom of our Decision node.

ADDING BURST SMS FEATURES TO YOUR PROGRAM CANVAS
Not only can you add SMS messaging to your Oracle Eloqua Campaign Canvas, you can also add SMS sending functionality to your Program Canvas. So rather than having to transform data and move it back to the Campaign Canvas for sending, you can send directly from the Program Canvas.
Sending Automated Text Messages - Program Canvas
1. Drag the Send SMS Action item to the Campaign Canvas, Click on the item to edit its settings.
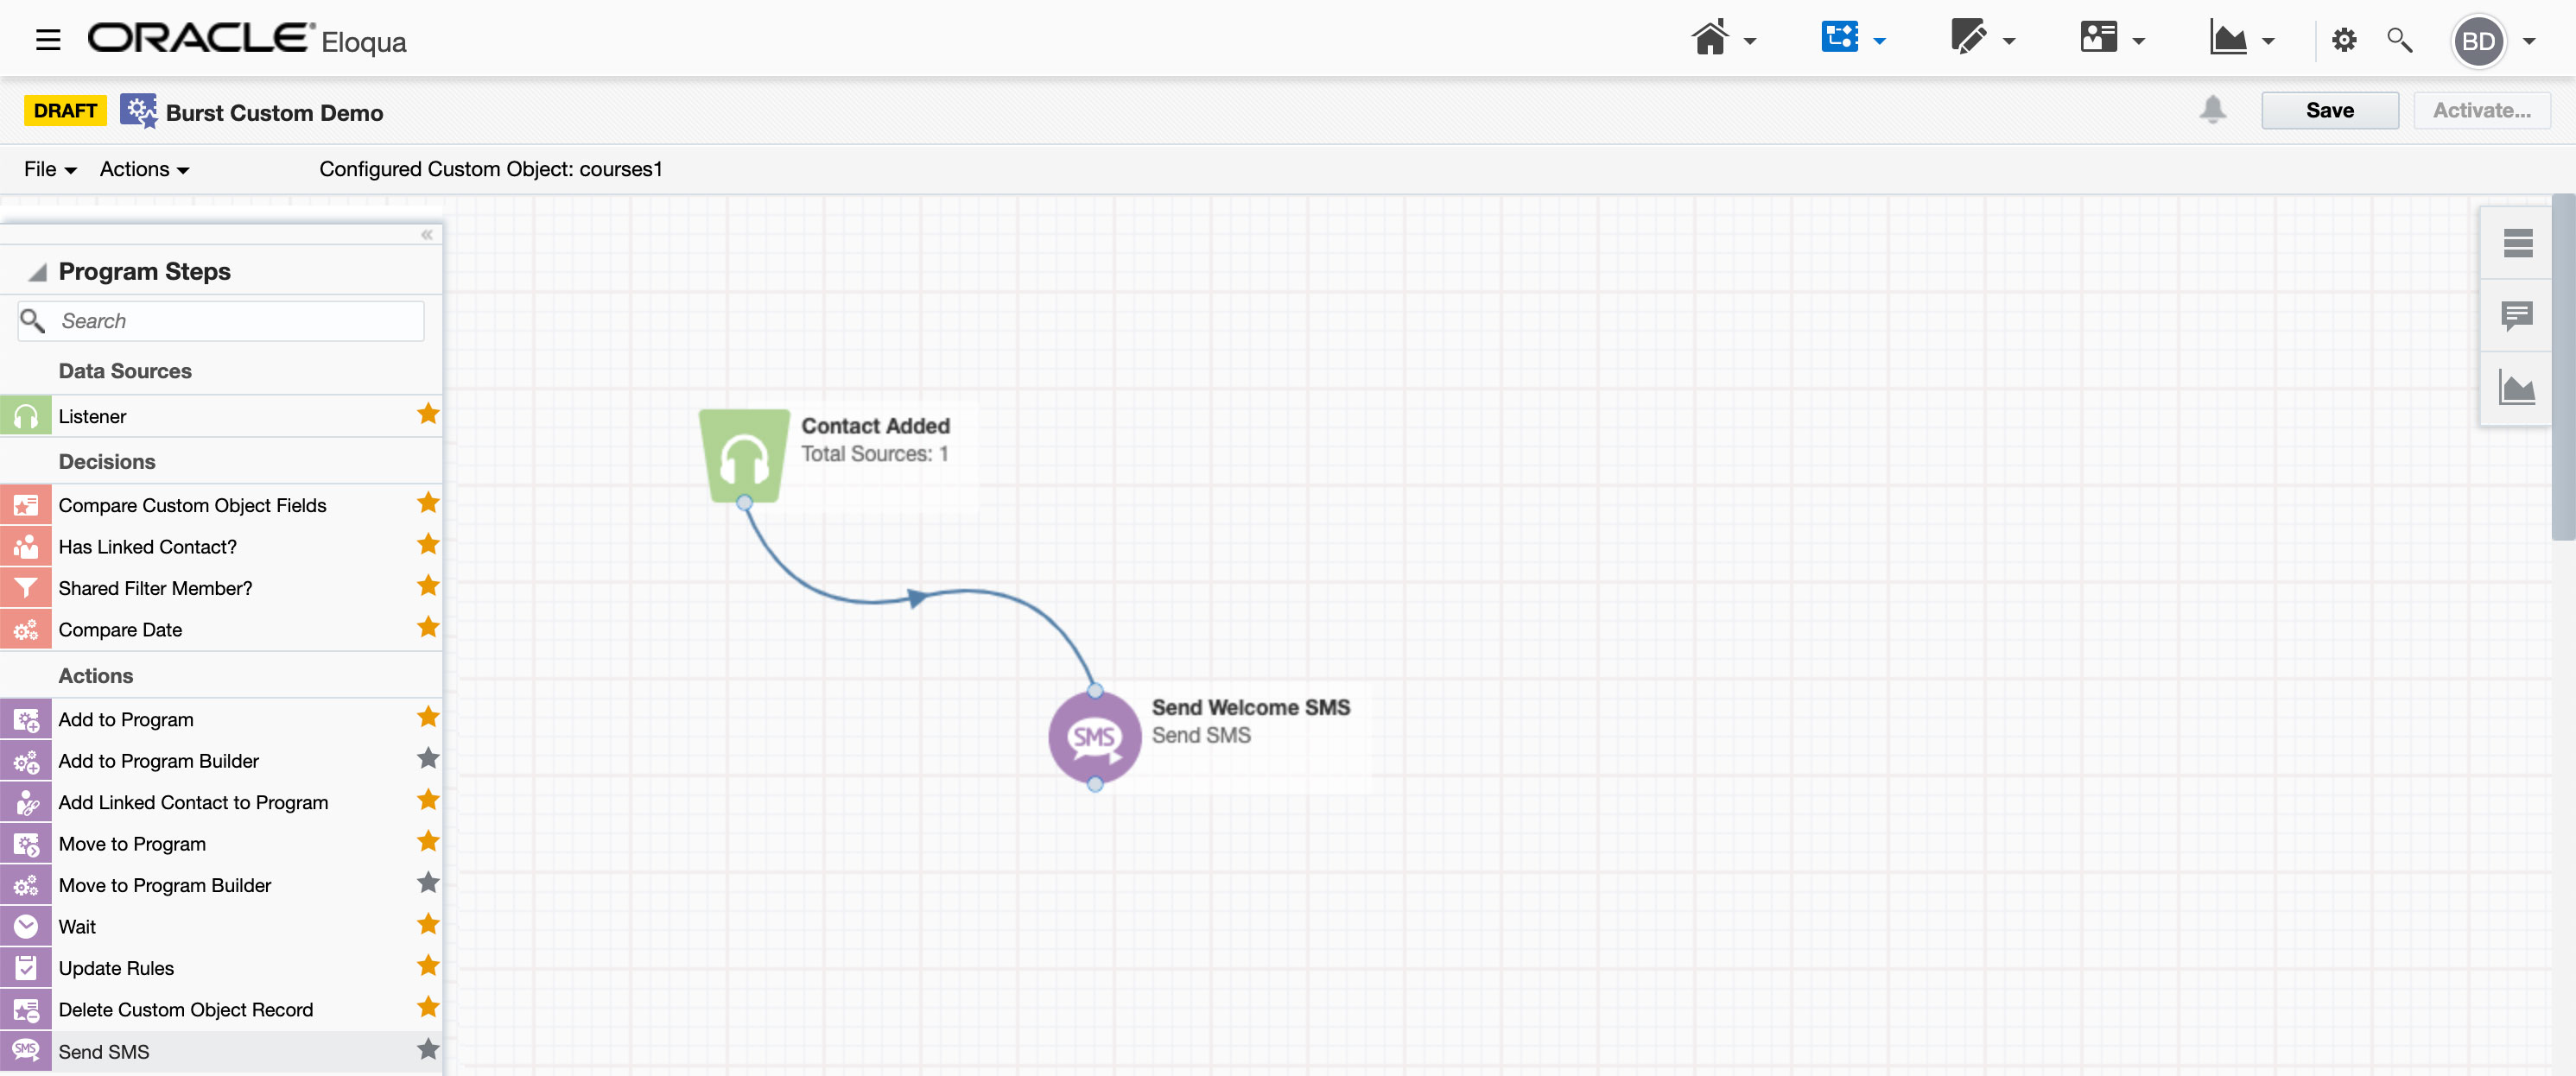
2. Click on the pencil to edit the Cloud Action

3. Setup your Send SMS Action options
ERROR HANDLING IN ORACLE ELOQUA
Due to the lack of direct error feedback when using the Oracle Eloqua API there are a few things to note to make sure that your contacts do not get stuck in your automation.
Error: Processing by external service
This is the most common feedback error you will get when you see a contact stuck in an automation. This means we have not received a delivery receipt for the carrier and are waiting to update it. This is where you can set the Message Expiry. Once a message has expired it will be processed as an error. You will need to set up an error handler on the node to process accordingly
Test SMS feature - You can enter your phone number and and click on TEST SMS button to send a message to your handset to preview the message. Please note the custom and contact field name will appear instead of the actual field data.
VERSION UPDATES
https://cloudmarketplace.oracle.com/marketplace/en_US/listing/66976444
1.18 - Add opt out filter per sender id and mobile when sending sms
1.17 - Bug fixed for retry issue when send sms element has CDO variable
1.16 - Support for [unsub-reply-link]
1.15 - Add SMS link hit feeder
1.14 - Enhance custom object mapping and Simplify the configuration steps
1.13 - Add monthly/yearly internal reports
1.12 - Custom Filter for Custom Object support in Message Template
1.11 - Added Send SMS action to Program Canvas
1.10 - Increase cron capacity
1.09 - Added custom object support for SMS message template
1.08 - Added logic to ignore existing message_id for Cloud Feeder enabling proper MO processing